Today I'm sharing my first page for my non-December Daily. As I think I've mentioned before, this year there is going to be a December Album, but it's not going to be daily and it appears not even going to be just about December. I'm renaming it my Christmas Album.
As one of the main reasons for visiting Edinburgh last weekend was to experience their Christmas Market it seems only appropriate that I should include a page about it in my 2017 album - and so my first page was created.
All the digital embellishments can be found at Designer Digitals and are by Katie Pertiet. The outside frame and top section date strip were created using Photoshop Elements.
I shall be sharing this page at Let's December Daily and also on facebook and instagram quite soon.
Huge thanks for looking, I really value your time. And keep crafting!
▼
Thursday, 30 November 2017
Tuesday, 28 November 2017
Tuesday Talk
I'm sharing a scrapbook page today using the second November sketch from Stuck?!Sketches.
This page is all about the determined streak appearing in my youngest grandson's character - can't begin to imagine where he gets that from!
So there we were at the playground and he wanted to go up the large climbing frame. Well as you can see the ladder was a stretch for him and I said 'no'. Hmm so much for my control!
I used a stencil and distress oxide ink to make the sunray in place of the circular element from the sketch. Then I adhered the photo stack on top and built up an embellishment cluster using stickers, die cuts and enamel dots.
And scare me you did - here's the proof:
Got that I told you so look! And then began the struggle to get you back down .......
Supplies:
Paper: Doodlebug Designs, Dragon's Tails
Stickers: Doodlebug Designs, Dragon's Tails; Kaisercraft
Stencil: Create A Smile
Ink: Ranger ditress oxide, salty ocean
Embellishments: Sparkles enamel dots
So pleased to have had your company today, thanks so much for visiting. And keep crafting!
Monday, 27 November 2017
Monday Moment
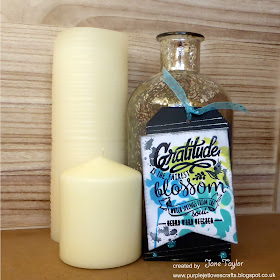
Just popping in to say hello really late in the day as I've a tag to share for the TAGplorations November Challenge.
And having just spent a lovely weekend away in Edinburgh I've a lot to be grateful for and need to keep that in mind when I tackle all the catch up jobs this has led to!
I stamped and heat embossed the STAMPlorations gratitude quote and then used an ARTplorations stencil to add the turquoise and green to the background. I inked round the banner and stamped some splodges before attaching it to a black die cut tag. Some sparkly stripes, dotty ribbon and a trio of sparkly enamel dots finished it all off a treat.
Supplies:
Stamps: STAMPlorations Typografia Thanksful
Inks: Ranger distress, black soot; Ranger distress oxide, salty ocean, peacock faethers, twisted citron; Versafine clear + Ranger superfine black embossing powder
Dies: MFT Die-namics, stitched jumbo fishtail banners, stitched traditional tags
Stncil: ARTplorations, Happy Flowers
Pen: Sakura gelly roll, clear star
Well that's it for today, thanks for looking. And keep crafting!
Sunday, 26 November 2017
AAA Cards - Challenge #104 Christmas
Christmas has come to the AAA Cards Challenge for the next fortnight. This should be the easiest theme ever!
Here's my card:
As Uniko are sponsoring this challenge I naturally pulled out some of my Uniko Christmas stamps to create my DT card. It features a couple of simple little trees standing on a snow covered hill and uses really traditional colours.
Supplies:
Stamps: Uniko, Christmas Pop, Reach For The Stars
Inks: SU, cherry cobbler, tranquil tide, soft suede, pool party
Embossing: Cuttlebug, Swiss Dots
Die: MFT Die-namics, stitched basic edges
Embellishments: Bling Bling gems; Wink of Stella, clear
There's plenty more Christmas going on over at the AAA Cards blog where our wonderful Guest Designer, Cathy, and the rest of the DT have CAS cards to get your creative juices flowing.
Thanks for looking today. And keep crafting!
Saturday, 25 November 2017
Saturday Slot
I've finally got round to scrapping a photo from the Happy little Stampers Retreat I went to in Stockport earlier this month. I've used the Challenge YOUrself theme - Use Sprays and Inks - I thought it was really fitting for a weekend full of inkyness!
Here's my inky page:
I started by using ink sprays in yellow and brown and then added some red ink spots by unscrewing the lid and flicking the applicator. Once that was dry I used a stencil to add some inky stripes to frame the photo.
Next I started to build up a stack of stickers. I chose a camera, suitcases and a taxi as well as some words that I thought were relevant. I added a washi strip to the top left and bottom right corners of the page as to help the flow.
Finally I added the journalling straight on top of one of the stencilled stripe blocks.
Supplies:
Paper: AC, kraft cardstock
Inmks: Ranger distress oxide, fired brick, fossilized amber; Mister Huey's color mists, plum thumb, sunshine, dark calico
Stencil: Uniko, Wonky Stripes
Stickers: AC, Shimelle
Washi from my stash
Thanks for looking today, it's been fabulous having your company for a while. And keep crafting!
Friday, 24 November 2017
Uniko Challenge - #44 Christmas
It's time for a new challenge over at Uniko. And it's such an obvious and really useful theme - CHRISTMAS. No excuses not to get your Christmas card stash enlarged then!
I seem to be forever using non-traditional colours on my cards this year and today's is all about the chill of Christmas and uses blues and white.
I used the newly released polka dot stencil and some very old chalky white ink lurking in my stash to create a bit of a snow storm on some dark blue card. I stamped the Uniko rustic tree in dark blue and hand cut it before popping it up on pads for dimension.
The greeting was stamped on top of the die cut snowy hill to finish off my card.
Supplies:
Stamps: Uniko, Rustic Christmas
Inks: SU, night of navy; VersaMagic, chalk white
Die: MFT Die-namics, stitched basic edges
Stencil: Uniko, scattered polka dots
So over to you now. If you're still needing more Christmas inspiration go and check out the Uniko DT creations HERE and then get crafting and linking up. Looking forward to seeing what you make!
Thanks for your time today, it was fun having you drop by my blog. And keep crafting!
Thursday, 23 November 2017
Thursday Thoughts
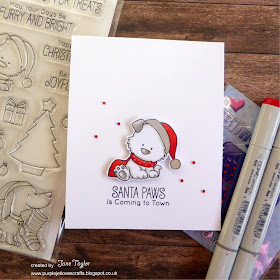
I couldn't resist the challenge at Less is More this week - it's to CASE the most adorable card by their DT member Susan.
And I do have that very same stamp set, but in the end I decided to go with a stamp from another set by MFT.
This was such an easy card to make! I simply stamped, coloured and hand cut the dog, mounted him on pads and stamped the greeting underneath.
I finished it all off by placing two trios of red gems.
Supplies:
Stamps: MFT, Happy Pawlidays
Ink: Memento, tuxedo black
Pens: Copic, W1, W3, W5, R24, R29; Gelly roll, silver
Embellishments: Bling Bling, red gems
And so another card goes into my Christmas stash. I'm doing really well this year, how about you?
Enormous thanks to you for visiting my blog today, it's always fabulous to have you drop by. And keep crafting!
Wednesday, 22 November 2017
Wednesday Words
I've another Christmas card added to my stash and I'm sharing it here today. And as it uses die cuts I'm entering it into the STAMPlorations Cutplorations challenge.
Here's my card:
I picked up on the colours from the inspiration photo using the biscuit colour for the gifts, the purple for the ribbons, the grey napkin colour for the sleigh and a trio of red gems to represent the red berries.
Supplies:
Stamps: STAMPlorations, Warm Hands, Warm Hearts
Ink: Memento, tuxedo black
Pens: cpic, V15, V17, N1, BV11, E50, E55
Dies: MFT Die-namics, double stitched rectangles & double stitched circles
Embellishments: Blin Bling, red gems
So pleased to have you drop by today, huge thanks for your time. and keep crafting!
Tuesday, 21 November 2017
Uniko - 25 Days of Christmas Tags
Today I'm here sharing a Christmas tag I made using Uniko products as they are sponsoring Tracey McNeely's 25 Days of Christmas Tags challenge today.
I decided to go with the traditional Christmas reds and greens for my colour scheme - and one big bonus of creating tags is that you get to use up all those left over pieces of card from other projects.
I stamped and coloured Uniko's wonky stripes and then die cut it into the tag shape. This was matted onto plain red cardstock. Next I stamped and hand cut the tree and popped it on top of a die cut wreath.
I finished off with a heat embossed greeting on a banner, some red twine and sparkling red gems.
Supplies:
Stamps: Uniko, Festive Sentiments, Background Blocks Wonky Outline Stripes, Christmas Pop
Inks: Memento, tuxedo black; SU, garden green; Versamark clear + Ranger superfine white
Pens: Copic R29
Embellishments: Bling Bling red gems
You can check out the rest of the Uniko DT creations at Tracey McNeely's challenge here. Have fun and enjoy!
Thanks for your time today, I really appreciate your visit to my blog. And keep crafting!
Monday, 20 November 2017
Monday Moments
Today I'm sharing a tag I started to make at the craft retreat I recently attended. I was inspired by Visible Image DT member Sharon and decided it was time to start giving my Visible Image stash a bit more love. Their challenge runs on facebook and the theme for November is to make a tag
Here's my tag:
I started by stamping and heat embossing the flower and then adding purple distress ink all over. Loving how shiny the flower was looking I also heat embossed the quote, then die cut it into a tag.
Next I popped on some Lustre Luxe in green and inked up the edges with black soot distress ink. The addition of some black and purple messy ribbons finished it all off.
Supplies:
Stamps: Visible Image, Flower Inkcognito & Take Chances
Inks: Versafine, clear + Ranger superfine black embossing powder; Ranger distress, wilted violet, black soot; Lustre Luxe, sea gren
Die: MFT Die-anamics, stitched traditional tags
Thread from staRibbons from my stash
Thanks for looking today, it's been great having your company for a while. And keep crafting!
Sunday, 19 November 2017
Sunday Stuff
I'm going to share a little more about my upcoming December album today.
This year I'm taking it really easy and not even going to try to add something for every day. In fact I'm calling it my Christmas 2017 album and not a December Daily. And I will be starting it before December as we have a trip to Edinburgh coming up and I'm hoping to catch some early Christmas vibes there.
So far I've bought the album with 8" x 8" page protectors and plan to create entirely digitally as it's so much quicker and easier than paper crafting. Not sure I'll manage to keep my hands off those papers though, but we'll see how it all pans out.
I've chosen very neutral colours this year - greys and beiges and am considering using black and white photos - just an idea at the moment.
Spurred on my Australian penpal Helen I've prepared my title/intentions page. Here it is:
Quite spectacular isn't it? See I can say that as most of it consists of a bought layout from Designer Digitals with just a little tweaking of the colours and the addition of my words. Here's how it started:
So I simply changed the green elements to beige brown shades and chose some favourite fonts for the text.
And in keeping with my need to simplify things this year my intentions are really simple too. I'm hoping they'll help me to balance out that rush and intense 'there's still so much to do' feeling I always get in December.
I've also created my planner for the season. I had so much fun choosing papers and elements, all from Designer Digitals.
And so it's begun! As I'm no longer on the DT for Let's December Daily I'll be sharing lots more of my Christmas album here on my blog this year, so I hope you'll join me in my journey. I'll still be linking up with Let's December Daily though and maybe you'll find time to go take a peek at their projects - they really know how to craft and play and create with all things artsy and inky and papery.
Thanks for looking today, I've loved having your company. And keep crafting!
Saturday, 18 November 2017
Saturday Slot
I'm playing at the MFT Sketch Challenge again this week. I do love the simplicity of their sketches - really suits my CAS style.
Today it's a Christmas card using a new to me MFT stamp and some of their dies too.
I decided to go with some chilly colours for this card and paired the greys and blues up with some sparkly silver cardstock.
The stocking and hat trims also got the sparkle treatment with a Sakura gelly roll pen.
Supplies:
Stamps: MFT, Happy Pawlidays; Uniko, Festive Sentiments
Ink: Memento, tuxedo black
Die: MFT Die-namics, stitched fishtail flag stax
Pens: Copics, Y18, Y35, YR15, W1, W3, W5, B00, B02, B04; Sakura gelly roll, clear star
I've been experimenting with my photo layouts for today's post, trying to make them more interesting and arty. I had fun with this but think I need a quick trip to The Range to snap up some cheap and cheerful items for future photos.
Thanks for your time today, I really appreciate your visit. And keep crafting!